Although here at R&A, we are lucky to have the talent of an in-house photographer on our team, we realize that it is not always feasible for every agency or small business.
Yet, we often get asked about how to create better content and images for social media, particularly ones that feel aligned with your brand, and creates some congruence on your Instagram feed.
We are sharing some of our top photo editing tips and tricks for more spontaneous social media posts, when we don’t have the luxury of having a professional camera nearby.
And still, we always start by recommending quarterly brands shoots to our clients. They are the best way to ensure you have high-quality, original images that speak uniquely to your brand and help tell your story.
Taking the Photos
When it comes to actually taking the photo, here’s what we recommend.
Aim for Natural Light as Much as Possible
Lighting always matters when it comes to photography. So even if you’re inside, try to get near a window. If you’re outside, aim to shoot in either full light or full shadow.
But like we said, spontaneous photos, right? So you can’t always control lighting.
What you can do, is at least tap your iPhone screen to select the area you want to focus on, which can brighten that part of the image. You can also toggle up the brightness (indicated by the sun icon) to add light to it.
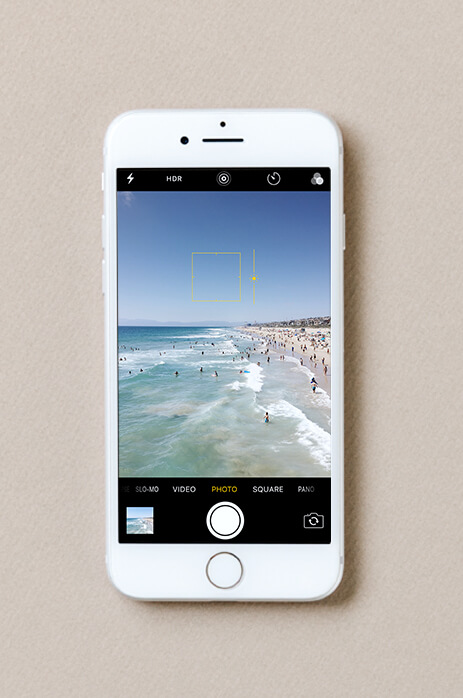
image source – Artifact Uprising
If you are shooting something like a sunset or landscape directly into bright light, sometimes it is better to leave it slightly darker and just play with the exposure when editing. More on that below!
Play with Portrait Mode
If your lighting is good and you want to play with what is called the “bokeh” effect (which blurs the background around your subject), put your iPhone on Portrait mode.
Our Brand Manager uses this a lot when taking photos in our conference room during team events, like this one and the image below.

It can make the photo feel more professional and narrow the focus to your primary subject, hence why it is called ‘Portrait’ mode.
Grid-Use & Alignment
When you tap on the screen of your iPhone while taking or editing a photo, it not only brightens it, it shows you a grid. This is important for checking alignment and ensuring your image is in the position you want it to be.
You will have less crooked photos and less cropping to do if you pay attention to this from the start.
The Rule of 3’s
On the note of using the grid, another professional photography concept is what is known as The Rule of 3’s.
This means that there are 3 columns within a photo grid, and your subject should intentionally be contained within one of them.
So you want your subject to either be centered as much as possible, off-center to the right, or off-center to the left.
This is what ends up being most sensical and pleasing to the eye, and ultimately, may help your photo get more engagement.
Editing the Photos
Now that you have taken a much better raw photo to begin with, editing will go much smoother!
There are a few great photo editing apps, but we really love Adobe Lightroom. If that feels intimidating, VSCO is a another good option that we will get to next.
Adobe Lightroom
Lightroom has a paid desktop version ($9.95/month) that is used by professional photographers, but it also has a free app.
The benefit of using this program is that it gives you full control of your images and you can edit just about any aspect of the photo, down to the individual colorway.
For example, we obviously love our teal, and avoid bright colors like red.
We can increase the teal saturation in an image, but reduce the red saturation, without affecting the coloring in the rest of the image.
Additionally, Lightroom also offers what is known as “Presets” where you can essentially import or save a whole set of edits and apply them to any photo.
This saves time in editing and allows you to create a more consistent look and style with your photos.
You can make your own within the app, buy them from photographers who sell them, or purchase them off of websites like Creative Market.
Most all preset purchases come with instructions on how to download them. We recommend getting familiar with the program first and then using them to give your photos a nice boost.
If you’re editing from scratch here are a few quick tricks we use to improve the appearance of the image:
- Up the exposure
- Down the highlights
- Increase the contrast
- Reduce shadows
- Lighten the whites
- Deepen the blacks
- Add sharpness
- Add masking &/or noise reduction
- Adjust the temperature as needed
- Adjust colors as needed
Try the above and watch your photo transform! That’s what we did to the photo below that had some pretty tricky lighting elements.

VSCO
This app can be a bit more approachable because it offers pre-made, consistent filters. And there are tons of them!
So whether you like your photos warmer, cooler, saturated or desaturated, you are bound to find one that fits your aesthetic.
You may still have to do some editing to the applied filter, like reducing the strength of it, increasing the exposure, playing with the contrast, sharpness, tone, or white balance.
Once you have found a filter you love…stick with it! Use it as much as possible, or at least one within the same family. For example, if you choose the set of “A” filters, there is A4, A5, A6; which will look very different from any of the “C” filters.
Previewing the Photo in a Planning Tool
Now that you have your photo captured and edited, it is time to preview it against the rest of your grid before posting it to Instagram.
There are a lot of apps and tools for this. To mention some:
- Planoly
- PLANN
- Preview
- Later
- Planable
Any of these apps will give you a “grid-view” of your content and allow you to see if you like the way your next post looks next to the images around it.
For example, you can see a sample of our feed in Planoly below. The post outlined in teal had not yet been posted, and allows us to see that it is a bit too similar to the post next to it and below it, so we would most likely find another option.
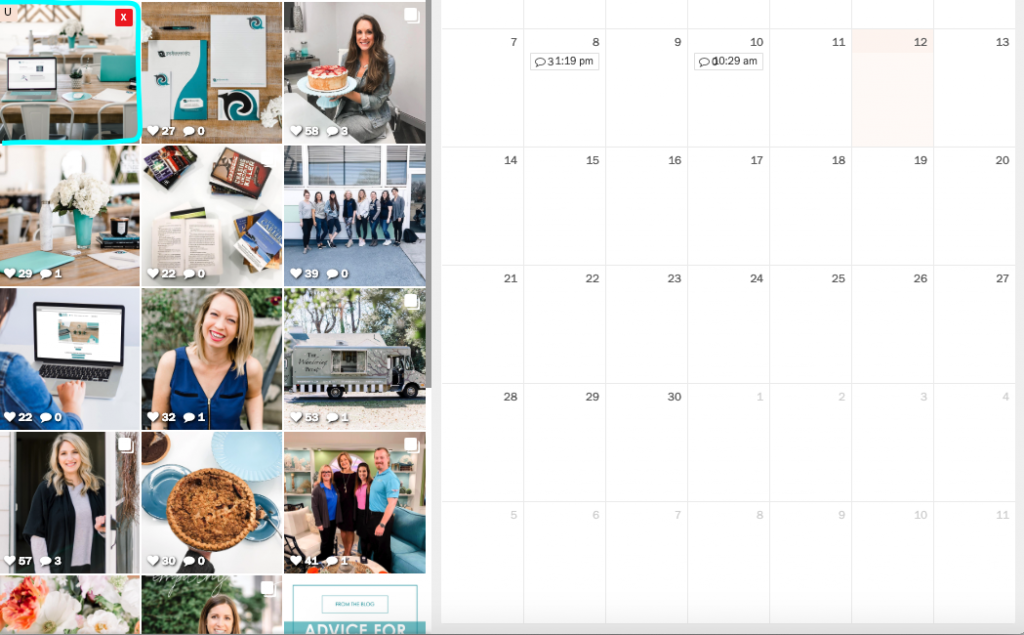
These apps offer a drag-and-drop functionality, so play with it until you love the look and feel of it!
Then you can schedule it through your planning app and be notified when it is time to post it, or go ahead and post it right away.
We hope this helps you feel like a pro when it comes to editing your photos for social media!
Have other ideas or tips and tricks? Share them in the comments below!
– The R&A Team